 My Favourites


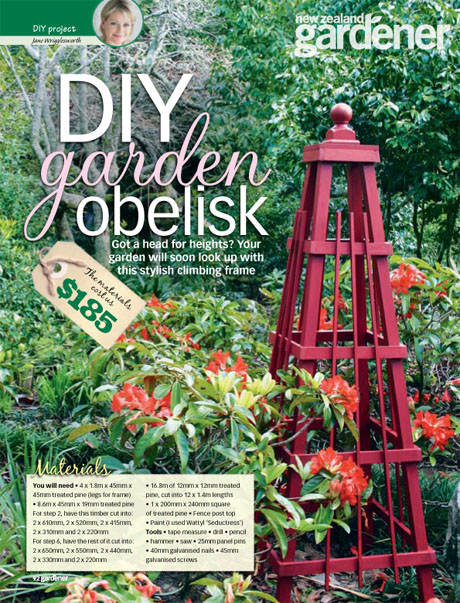
Here is a project created by Sweet Living’s very own editor, Jane, and her handyman dad, Don. This stylish climbing frame is super easy to make and can be finished off in a day. If you don’t have a power saw, ask your local building supplier to cut the timber to size. You will still need a handsaw though to cut the support pieces later on.
The beauty of making your own garden obelisk is that you can finish it in the colour of your choice. Make it stand out with super bright colours such as orange, blue or red or go for a softer look with eggshell blue or shabby chic white.
Garden obelisk
You will need:
- 4 x 1.8m x 45mm x 45mm treated pine (legs for frame)
- 8.6m x 45mm x 19mm treated pine (for step 2, cut lengths of 2 x 610mm, 2 x 520mm, 2 x 415mm, 2 x 310mm and 2 x 220mm; for step 6, cut lengths of 2 x 650mm, 2 x 550mm, 2 x 440mm, 2 x 330mm and 2 x 220mm)
- 16.8m of 12mm x 12mm treated pine (cut into 12 x 1.4m lengths)
- 1 x 200mm x 240mm piece of treated pine
- Fence post top
- Power saw (or handsaw)
- Drill
- 40mm galvanised nails
- 45mm galvanised screws
- 25mm panel pins
- Hammer
- Tape measure
- Pencil
- Exterior paint
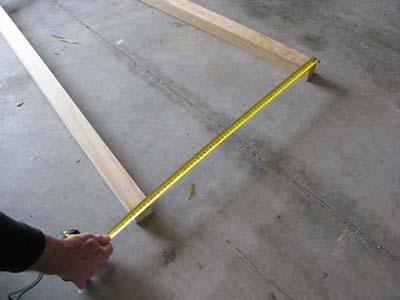
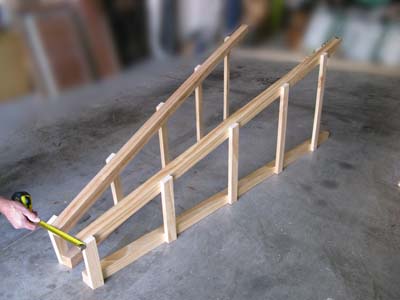
1. Lay two of the legs in an open-ended V, with the base of the legs 650mm apart and the top 200mm apart (measuring from outside edges).
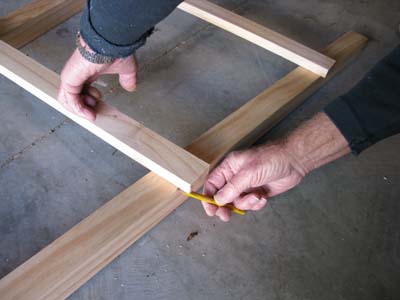
2. Use the first set of 45mm x 19mm cut lengths and place them on the V frame, as shown, spaced at even distances, and at a point where they slightly overhang the edges.

3. Using a pencil, mark the angle on the underside of each supporting piece where the wood needs to be cut to line up with the frame. Remove from frame and cut with saw.
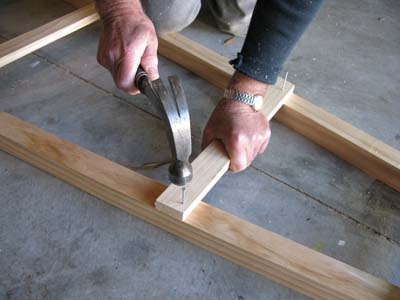
4. Nail support pieces to frame, using two nails per end. Repeat for the other two legs, laying down another V frame and attaching the supports.
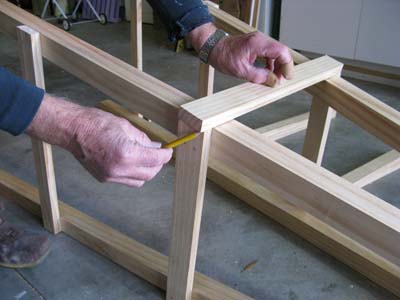
5. Lay the two frames upright on their sides. Measure and set the bottom legs 650mm apart and the top 200mm apart (measuring from outside edges).
6. Place second set of 45mm x 19mm cut lengths on the frame in line with other supports. Mark cutting angle, cut and nail.
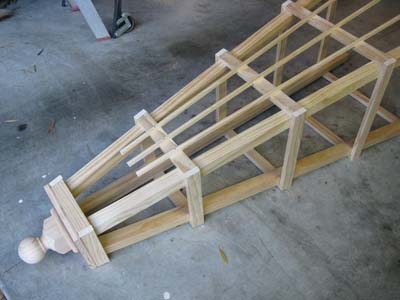
7. Drill a pilot hole in the centre of the 200mm x 240mm piece of wood. Screw the piece of wood to the fence post top. Screw to the top of the frame.

8. Nail three lengths of 12mm x 12mm pine to each side of the frame using the panel pins. Finish off by applying two or three coats of paint.
This project featured in NZ Gardener magazine.


Great, clear instructions! Thank you very much! Now I know I can build my own obelisk following your direction!
Have fun!
Hello! I LOVE this plan but…how do you do it in feet and inches? We don’t work in meters and mm’s! Please help!
Hi Tanya
So sorry, we don’t have this in feet and inches – but we will look at doing that. In the meantime, http://www.onlineconversion.com is a superb site that can help with conversions. 🙂
Great instructions! We used them to build an obelisk for a clematis. One note:in your description for the sizes of the wood you mentioned 2 x 220 mm for the smallest pieces, and again 2 x 220 mm for the second set that goes over the first set. I saw that just in time and we cut our second pieces 235 mm. They could be cut 240 mm and then you would have room for error.
We usually use inches and feet in our measurements, but it works just as easily if you have a metric tape measure. Thanks for sharing. Much appreciated!
Thank you for picking that up, Wilma! I’m glad it worked out for you 🙂
I’d bookmarked this pattern since seeing it whilst visiting New Zealand a few years back. I pulled it out last week and my husband and I got to work on it. It is now sitting in the garden waiting for a clematis or two. The instructions were very clear and it went together really well, the longest part being the painting. As we’ve all had to go to ground here re: COVID-19, it was a good project to see us through this week. Thanks Jane.
That’s great Pat. I’m so glad it worked out well. 🙂
Thank you for your design. I tried to make another one from you tube but it got a bit complicated and I had to watch so many times just to see what the person was actually doing. Your straight forward and simple, great work. Will tell friends about you.
Thanks Nigel 🙂
Thank you for publishing an obelisk plan in metric measurements. The internet is full of US plans and videos in ye olde imperial inches, which make no sense to me whatsoever.
Hope to try building one or more of these over the summer.
Great! Have fun. 🙂
I love this obelisk, however I know nothing about converting it to US measurements. Please print this wonderful plan for me I desperately want this obelisk in my cottage garden I love it!
I’m at the hardware store a bit confused by the measurements, does it turn out more like a rectangle rather than square? Wilma’s comment has made me wonder what I’m missing! Looking forward to the project through, thank you!
Hi Tania
The obelisk is the same as the top image. There was an error originally, but it has now been corrected.