 My Favourites


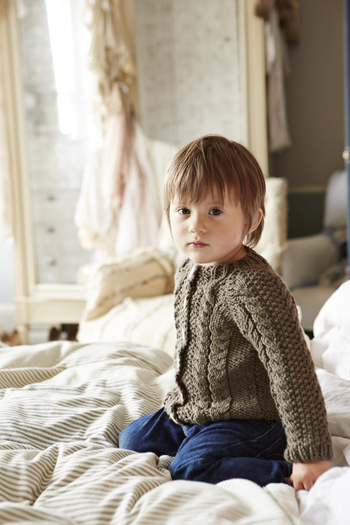
 Nikki Van de Car’s wear-anywhere cable-knit cardi is the cutest addition to a little one’s wardrobe. Get the pattern here.
 What to Knit: The Toddler Years is Nikki Van de Car’s latest book, and what a beauty. It features 30 stylish and practical patterns, everything from a hooded jumper and roomy overalls to a lace panel cardigan, pullovers, vests, hats and toys. It includes an illustrated guide to all the basic knitting techniques you need, which means all these patterns are accessible to knitters of all abilities. A lovely book for yourself or a friend.
Extracted with permission from What to Knit the Toddler Years: 30 gorgeous jumpers, cardigans, hats, toys & more by Nikki Van De Car, with photography by Ali Allen. Published by Kyle Books and distributed in New Zealand by New Holland, RRP $39.99.
![]()
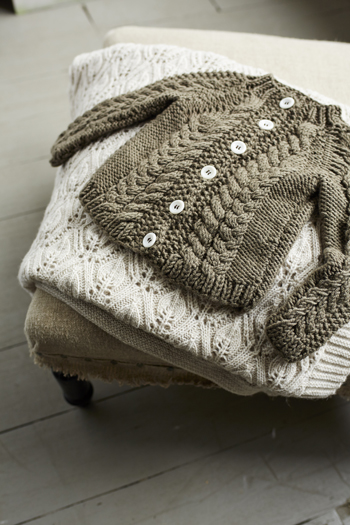
Kalen Cardigan

Click to enlarge
My cousin’s son Kalen will sleep through anything, is happy to be held by anyone and is generally the most easy-going child I’ve ever met. His name is Irish for ‘warrior’, and this cable-knit is for him, even if he is an entirely peaceful soul.
Sizes
12–18 months (18–24 months, 2T, 3T, 4T) (shown in 2T)
Materials
• 2 (2, 3, 3, 3) x 100g skeins Skacel Simpliworsted (shade: 064 Totally Taupe)
• 1 x pair of 6mm knitting needles
• 2 x stitch markers
• Cable needle
• Spare yarn
• Tapestry needle
• 5 x 25mm buttons
Click to enlarge
Tension
16 sts and 20 rows to 10cm over st st using 6mm needles.
Pattern
Back
CO 45 (47, 49, 51, 53) sts.
Next row (WS): *k1, p1, repeat from * to last st, k1.
Next row (RS): *p1, k1, repeat from * to last st, p1.
Repeat last 2 rows once more, then work 1 more WS row.
Next row (RS): p to end.
Next row (WS): k to end.
Repeat last 2 rows until piece measures 17cm (18cm, 19cm, 21cm, 23cm) from cast-on edge, ending with a RS row.
Cast off 3 sts at the beginning of the next 2 rows. 39 (41, 43, 45, 47) sts.
Next row (WS): k2, ssk, k to last 4 sts, k2tog, k2.
Next row (RS): p to end.
Repeat last 2 rows 8 (9, 9, 10, 10) times more, then work 1 more decrease row. Break yarn and place remaining 19 (19, 21, 21, 23) sts on spare yarn.
Click to enlarge
Right Front
CO 17 (19, 21, 23, 25) sts.
Next row (WS): *k1, p1, repeat from * to last st, k1.
Next row (RS): *p1, k1, repeat from * to last st, p1.
Repeat last 2 rows once more, then work 1 more WS row.
Sizes 12–18 months and 18–24 months only
Row 1: p1, k6, p1, k2, sl 1, p6 (8).
Row 2: k6 (8), sl 1, p2, k1, p6, k1.
Row 3: p1, C6B, p1, C3F, p6 (8).
Row 4: k6 (8), p3, k1, p6, k1.
Sizes 2T, 3T and 4T only
Row 1: p1 (1, 2), k6, p1 (1, 2), C4B, k2, p7 (9, 9).
Row 2: k7 (9, 9), p6, k1 (1, 2), p6, k1 (1, 2).
Row 3: p1 (1, 2), C6B, p1 (1, 2), k2, C4F, p7 (9, 9).
Row 4: k7 (9, 9), p6, k1 (1, 2), p6, k1 (1, 2).

Click to enlarge
All sizes
Repeat Rows 1–4 until piece measures 17cm (18cm, 19cm, 21cm, 23cm) from cast-on edge, ending with a RS row.
Maintaining cable pattern established, work Raglan decreases as follows (Note: as your work decreases, you will no longer be able to work all the cable sts as written.
Work those sts in st st, keeping 3 armpit sts in reverse st st):
Next row (WS): cast off 3 sts, work to end in pattern.
Next row (RS): work to end in pattern.
Next row (WS): k2, ssk, work to end in pattern.
Next row (RS): work to end in pattern.
Repeat last 2 rows 8 (9, 9, 10, 10) times more, then work one more decrease row. Break yarn and place remaining 4 (5, 7, 8, 10) sts on spare yarn.
Left Front
CO 17 (19, 21, 23, 25) sts.
Next row (WS): *k1, p1, repeat from * to last st, k1.
Next row (RS): *p1, k1, repeat from * to last st, p1.
Repeat last 2 rows once more, then work 1 more WS row.
Sizes 12–18 months and 18–24 months only
Row 1: p6 (8), sl 1, k2, p1, k6, p1.
Row 2: k1, p6, k1, p2, sl 1, k6 (8).
Row 3: p6 (8), C3B, p1, C6F, p1.
Row 4: k1, p6, k1, p3, k6 (8).
Sizes 2T, 3T and 4T only
Row 1: p7 (9, 9), k2, C4F, p1 (1, 2), k6, p1 (1, 2).
Row 2: k1 (1, 2), p6, k1 (1, 2), p6, k7 (9, 9).
Row 3: p7 (9, 9), C4B, k2, p1 (1, 2), C6F, p1 (1, 2).
Row 4: k1 (1, 2), p6, k1 (1, 2), p6, k7 (9, 9).
All sizes
Repeat Rows 1–4 until piece measures 17cm (18cm, 19cm, 21cm, 23cm) from cast-on edge, ending with a WS row.
Maintaining cable pattern established, work Raglan decreases as follows (Note: as your work decreases, you will no longer be able to work all the cable sts as written. Work those sts in st st, keeping 3 armpit sts in reverse st st):
Next row (RS): cast off 3 sts, work to end in pattern.
Next row (WS): work to last 4 sts, k2tog, k2.
Next row (RS): work to end in pattern.
Repeat last 2 rows 8 (9, 9, 10, 10) times more, then work 1 more decrease row. Break yarn and place remaining 4 (5, 7, 8, 10) sts on spare yarn.
Sleeves (make 2)
CO 25 (25, 27, 27, 29) sts.
Next row (WS): *k1, p1, repeat from * to last st, k1.
Next row (RS): *p1, k1, repeat from * to last st, p1.
Repeat last 2 rows once more, then work 1 more WS row.
Work cable pattern as follows:
Row 1: p2 (2, 3, 3, 4), pm, sl 1, k2, p1, k4, p1, k1, p1, k1, p1, k4, p1, k2, sl 1, pm, p to end.
Row 2: k to marker, sl marker, sl 1, p2, k1, p5, k1, p1, k1, p5, k1, p2, sl 1, sl marker, k to end.
Row 3: p to marker, sl marker, C3F, p1, C4B, p1, k1, p1, k1, p1, C4F, p1, C3B, sl marker, p to end.
Row 4: k to marker, sl marker, p3, k1, p5, k1, p1, k1, p5, k1, p3, sl marker, k to end.
Row 1 (increase row): p2, m1p, p to marker, sl marker, sl 1, k2, p1, k4, p1, k1, p1, k1, p1, k4, p1, k2, sl 1, sl marker, p to last 2 sts, m1p, p to end. 27 (27, 29, 29, 31) sts.
Row 2: k to marker, sl marker, sl 1, p2, k1, p5, k1, p1, k1, p5, k1, p2, sl 1, sl marker, k to end.
Row 3: p to marker, sl marker, C3F, p1, C4B, p1, k1, p1, k1, p1, C4F, p1, C3B, sl marker, p to end.
Row 4: k to marker, sl marker, p3, k1, p5, k1, p1, k1, p5, k1, p3, sl marker, k to end.
Row 5: p to marker, sl marker, sl 1, k2, p1, k4, p1, k1, p1, k1, p1, k4, p1, k2, sl 1, sl marker, p to end.
Row 6: as Row 2.
Row 7: as Row 3.
Row 8: as Row 4.
Repeat last 8 rows 4 times more, until you have 35 (35, 37, 37, 39) sts.
Work straight in pattern until piece measures 20cm (21cm, 22cm, 24cm, 26cm) from cast-on edge, ending with a RS row.
Cast off 3 sts at the beginning of the next 2 rows.
Begin working decreases. (Note: as your work decreases, you will no longer be able to work the cable sts as written for all the sts. Work those sts in st st, keeping 3 armpit sts in reverse st st.)
Next row (WS): k2, ssk, work to last 4 sts, k2tog, k2.
Next row (RS): work next RS row.
Repeat last 2 rows 8 (9, 9, 10, 10) times more, then work 1 more decrease row. Break yarn and place remaining 9 (7, 9, 7, 9) sts on spare yarn.
Join pieces
Place Right Front sts on needle with RS facing. Attach yarn and work to last 2 (2, 3, 3, 3) sts.
Sizes 12–18 months and 18–24 months only:
k2tog.
Sizes 2T, 3T and 4T:
sl 1-k2tog-psso.
Place First Sleeve sts on needle with RS facing. Using working yarn attached to Right Front, work as follows:
Sizes 12–18 months and 18–24 months only:
ssk, work to last 2 sts, k2tog.
Sizes 2T, 3T and 4T:
sl 1-k2tog-psso, work to last 3 sts, sl 1-k2tog-psso.
Place Back sts on needle with RS facing. Using working yarn attached to First Sleeve, work as follows:
Sizes 12–18 months and 18–24 months only:
ssk, work to last 2 sts, k2tog.
Sizes 2T, 3T and 4T:
sl 1-k2tog-psso, work to last 3 sts, sl 1-k2tog-psso.
Place Second Sleeve sts on needle with RS facing. Using working yarn attached to Back, work as follows:
Sizes 12–18 months and 18–24 months only: ssk, work to last 2 sts, k2tog.
Sizes 2T, 3T and 4T:
sl 1-k2tog-psso, work to last 3 sts, sl 1-k2tog-psso.
Place Left Front sts on needle with RS facing. Using working yarn attached to Second Sleeve, work as follows:
Sizes 12–18 months and 18–24 months only:
work to last 2 sts, k2tog.
Sizes 2T, 3T and 4T:
work to last 3 sts, sl 1-k2tog-psso. 35 (33, 35, 33, 43) sts.
Size 4T only
Next row (WS): work 6, k2tog, work 3, k2tog, work 17, k2tog, work 3, k2tog, work to end. 39 sts.
Sizes 12–18 months, 18–24 months, 2T and 3T only
Next row: work to end in pattern.
All sizes
Next row (RS): *p1, k1, repeat from * to last st, p1.
Next row (WS): *k1, p1, repeat from * to last st, k1.
Next row (RS): *p1, k1, repeat from * to last st, p1.
Next row (WS): *k1, p1, repeat from * to last st, k1.
Cast off all sts in rib pattern.
Finishing
Starting at the top and working your way down, with RS facing, sew together raglan seams, then side seams, then sleeve seams, using mattress stitch (see page 16). Weave in ends.
Button Band
Starting at bottom edge of Right Front, with RS facing, pick up and k 49 (53, 57, 63, 67) sts along side edge.
Next row (WS): *k1, p1, repeat from * to last st, k1.
Repeat this row once more.
Next row (WS): k1, p1, yf, p2tog, [work 8 (9, 10, 11, 12), yf, p2tog] x 4, work to end.
Next row (RS): *k1, p1, repeat from * to last st, k1.
Cast off all sts in moss stitch pattern.
Starting at top edge of Left Front, with RS facing, pick up and k 49 (53, 57, 63, 67) sts along side edge.
Next row (WS): *k1, p1, repeat from * to last st, k1.
Repeat this row 3 times more.
Cast off all sts in moss stitch pattern.
Weave in ends.
To block, soak in lukewarm water for a few minutes, then lay flat to dry, taking care to press the reverse st st seams so they lay flat. Sew buttons opposite buttonholes.


Hi there, this is a beautiful pattern, but since we are in New Zealand I have no idea where to buy this yarn. I also have no idea what weight it is, so I could find a substitute.
May I suggest that when sharing overseas patterns, you provide alternative local sources/info for materials? That would be fantastic. Thanks!
Hi Steph. Great comment. The yarn mentioned is worsted weight yarn. Your local wool supplier should be able to help you with a suitable substitute. However, bear in mind that worsted weight yarn is a yarn that knits 16-20 stitches per 10cm x 10cm (4 inch x 4 inch) square. This should be indicated on the label of the yarn you are purchasing. You may also find worsted in the same category as aran and afghan. Hope this helps.
Hi there, Thank you for helping in the substituting of yarns, but I’m from Australia and I’d like also your abbreviations to be included. I’d really like to knit this for my little grandson, but have no idea what ssk, C6B, C3For C4B means, I’m presuming the C means cable, Back for back and F for Front, but don’t understand what they really mean. It would be exceptionally helpful for us overseas knitter to have all the information. Thanks for submitting a lovely pattern.
SSK = slip, slip, knit (slip next 2 stitches knitwise. Slip the tip of left needle into the front of the slipped stitches, and knit them together – 1 stitch decreased).
C6B = Cable 6 Back. Slip next 3 stitches onto cable needle and hold at back of work. Knit next 3 stitches from left needle, then knit stitches from cable needle.
C4B = Cable 4 Back. Slip next 2 stitches onto cable needle and hold at back of work. Knit next 2 stitches from left needle, then knit stitches from cable needle.
Hi, it’s a lovely pattern and I’d like to make it for newborn. I’d appreciate if you could help me with number of stitches required at different stages. I am first time mom, so not sure about the size 🙂
Hi Gargi. This is an extract from a book so we have not knitted it ourselves. However, it does mention the stitches required in the pattern.
Hi, I just started this adorable sweater for my grandson and on the Back working as a 3T,(51) I can’t seem to come up with the same sts as I have 31 sts left on after doing the 10 rows and do not know how to come up with 21 sts, was it a typo? I will start the other sections and would love to hear from you. Thanks
Hi Maureen. Unfortunately as this is an extract from a book I can’t actually help you there. However, I will see if I can contact the author and let you know.
Hi Maureen. The author, Nikki, has replied as such:
“The numbers in the book add up correctly for me. Are you decreasing one stitch at each end? Have you repeated the decrease rows the correct number of times?”
Hopefully this helps.
Hi dear;
Please would you explain to me this sentence Break yarn and place remaining 4 (5, 7, 8, 10) sts on spare yarn.i’m a new knitter
Thanks
I am making this at the moment and am quite new to knitting. I have reached the decreases at the back, I am not sure how to interpret the pattern at this point.
“Cast off 3 sts at the beginning of the next 2 rows. 39 (41, 43, 45, 47) sts.
Next row (WS): k2, ssk, k to last 4 sts, k2tog, k2.
Next row (RS): p to end.”
Does this mean cast off 3 then complete a purl row, then cast off three then complete a plain knit row, then commence the decreases in the next two rows
OR
Does it mean cast off three then commence the k2, ssk, lot last 4sts, k2tog, k2 all as one row?
Please help!
Hi Emma
We asked Nikki and she says: “It means Cast off 3, then complete a purl row. Cast off 3, then complete a knit row. Then commence the decreases in the next two rows.”
Thank you so much 🙂
I have noticed a pattern error in the left front 3T instructions two rows of the pattern state 7 stiches but should say 9 otherwise the pattern doesn’t line up and the stitch count for the row would be wrong
I need a little guidance with the sleeves
I’m not sure how to C3F or C3B as three is an odd number and previously in the pattern previously cable 4 meant two stitches on cable needle and cable 6 meant three. I can’t work out how to split the stitches for C3F or C3B
Looking forward to some help.
Cannot wait to complete this and post it on my blog.
I have queried this with the author. Will have an answer soon.
Hi Emma
You are right. Nikki has replied (It has been changed above too):
Yes, that one is an error in the pattern! It should read:
Row 1: p7 (9, 9), k2, C4F, p1 (1, 2), k6, p1 (1, 2)
Row 3: p7 (9, 9), k2, C4B, p1 (1, 2), k6, p1 (1, 2)
C3F: Slip next st onto cable needle and hold at front of work. K next 2 sts from left needle, then k st from cable needle
C3B: Slip next 2 sts onto cable needle and hold at front of work. K next st from left needle, then k sts from cable needle.
Hi, I have reached the end of the back and I’ve never knitted a cardigan begire so this is very challenging for me! Just a quick clarification as I don’t want to mess up!… At the end of the back it says to do one more “decrease row” is this the cast off 3 row or the ssk row? TIA x
Doe 6mm knitting needles = US size 6 or 10
Hi Donna
This is US 10.
I am having difficulty knitting the sleeve . I making a hole similar to a button hole in the k/p sides of the sleeve and also creating a strange stitch that seems to be drug over several rows of stitches. I assume it must have something to do with the way I am attempting to do the following sl 1 m1p C3F C3B
When I looked up these stitches on line I thought I understood them but I must not. I assumed that C3B the stitches were taken to the back but in a reply I just read dated jan 16th it says that both C3F and C3B are brought to the front? Please help. I have torn the sleeve out at least 4 times and cant seem to get it,. I easily knitted the rest of the sweater parts.
Hi Donna
I will ask the author and get back to you asap.
Hi again Donna
Here is Nikki’s answer:
“It is an unusual stitch–one stitch is dragged over several stitches, so it sounds like it’s being done correctly.
The C3B and C3F stitches are worked like so:
C3B: Slip next 2 sts onto cable needle and hold at back of work. Knit next st from left needle, then knit sts from cable needle.
C3F: Slip next st onto cable needle and hold at front. Knit next 2 sts from left needle, then knit st from cable needle.”
Thank you so much for the speedy reply . I have enjoyed being able to ask questions knowing there really is some help. Can’t wait to get at the sleeves and finish up the sweater.
I am making the sleeves for toddler cardigan sweater the m1 keeps making a hole in the sleeve. How do you make m1 so there is no hole?
Hi Adele
Here is a blog post that addresses the issue:
http://fibernacci.blogspot.com/2008/12/m1-tutorial.html
Good luck.
the slipped stitches on the sleeve on rows 1 2 5 6 make the cable on the sleeve look different from the cable on the sweater front. Is that supposed to happen?
Nikki says: The sleeve stitches are a slightly different cable stitch than the front.
When putting the pieces together I get 45 stitches instead of 43 for size 4T. I did the line putting the parts together twice with the s1 k2 tog pass slip stitch over. At the end I got 45 stitches instead of 43. I get 19 stitches left for the back, 5 stitches left for each sleeve and 8 stitches left for each front adds up to 35.What am I doing wrong or the instructions incorrect?
sorry on last line of my question meant 45 not 35 mistake in typing
Adele, this is a book extract. Unfortunately we cannot answer your question. You would be best to go directly to the author. Her website is here: http://www.whattoknitwhen.com You can find her email in the ‘About Me’ section when you click on her name.
Hi there,
I am making this for my son to wear this Fall and Winter and I’m wondering if there are guidelines on finished see measurements? I’ve started the first few rows of the 2T size and it looks quite large, even at proper tension. Any ideas? Thanks!
Finished *size measurements, sorry for the error
I’m very sorry Jennifer. There were no size measurements in the book extract. Just what is above.
Thanks for your reply. I’m working the 18-24 month size, and am now joining and this seems to be true to most 24 Month size clothing, for other readers. 🙂
Thanks so much for your feedback, Jennifer. Good luck with your project. 🙂
Good evening!
Is it possible to have a video tutorial?
Hi Maria
I’m sorry, this is not actually our pattern. It is a book extract, so we are unable to help you with this at this time.
Hello
The sweater is lovely. But I can’t help but wondering…can you tell me where I can get the
Pattern for the blanket under the sweater? It’s beautiful too. The stitch work is lovely. Do
You know the name of that pattern?
Hi April
I will ask the author.
Is it possible to have the pattern in french please?
Tank you so much
Sorry Marjolaine, we don’t have it in French. Can any of our readers who speak French help?
I am making this sweater and I am making the sleeves and I got to the point that is says work straight in patter can u please explain what that mean . Thank you Maria
Hi Maria. It just means work in the specified pattern, without increasing or decreasing, until you reach the stated measurement – in this case 20cm.
Hi Jane thank you the help u gave me before , I just came across another issue on the button band it says : on wrong side K1, P1 , yo, P2tog [ work 8 (9,10,11,12) yo p2tog ] x4 work to end the part I don’t understand the work 9 what is that I am working . Thank you
Hi Maria
I asked the author of this pattern, Nikki, to explain for you. She wrote: “work” simply means knit the stitches as they lie, according to the pattern–so knit where there’s a knit stitch, purl where there’s a purl stitch, if it’s time to cable work a cable, etc.
Also, you might like to check out this site, which explains further about it. Good luck!
Hi Was wondering if this would work with a cotton yarn?
Hi Nancy. I’m sorry, we can’t really comment on that. The designers usually state that you shouldn’t use any other yarn as what is specified, as their designs have been tested in those specific yarns. It may work OK if it’s a similar weight. 🙂
I’m knitting this cardigan right now and have re/knit the sleeves 5 times. The stitches that are constantly slipped make the sleeves curl and it doesn’t look anything like the photos. Is this right? I can see how sewing the sleeve together would make it lie flat and there’s no way to knit it flat with the slipped stitch.
I mean, I can’t see how seeing the sleeve together would make it lie flat
Hi Paula. As this is a book extract, you might be best to go directly to the author. Her website is here: http://www.whattoknitwhen.com You can find her email in the ‘About Me’ section when you click on her name. Good luck!
Can you explain what 2T 3T ect means? Are they sizes, Ages?
Thanks
Theresa
Hi Theresa. T2= 2-year-olds; T3= 3-year-olds; T4= 4-year-olds
Hi Jennifer, does this pattern come in PDF downloadable printout?
Hi Helen
There is no pdf version, but if you scroll down to the bottom of the article you will see ‘sharing is caring’. Click on the light green button in the middle for the print-friendly version to print out. 🙂
Very strange pattern. Fronts are narrower than the back and it’s very narrow across the chest because the cables make the front more rigid (ie less stretch because of the twisted stitches in the cables). The cables in the photo are different to the cables on the pattern. I am an experienced knitter and was disappointed with the finished product
Hi there,
Thank you for this beautiful pattern. I have finished knitting all the pieces for the 4T, all the pieces turned out as the pics. Do you have the dimension of the pieces I should block them to? It seems the left and right fronts will have to be stretched out width wise quite a bit to match the back due to the cables.
Hi Tsz
I’m so sorry, we only have the pattern from the book as above.
Just started the front of this pattern and wondering whether the slip stitches are slip as to purl or slip as to knit? Thanks for response on the cable instructions you gave to writer from Australia.
Hi Nancy
This is a book extract, so unfortunately we cannot answer your question ourselves. You would be best to go directly to the author. Her website is here: http://www.whattoknitwhen.com
Her email is in the right-hand column. Good luck!
Things went fairly smoothly on this project I did have trouble with the c3f c3b but other than that once I read here had a take care of that I was fine. However when I got to the finish I couldn’t understand any of the directions for finishing. So I guess I know now to read a pattern very thoroughly start to finish before I take on a project. I love the sweater itself it’s too bad I cannot get it finished.