 My Favourites


 This charming cushion features in Christine Leech’s new book, Felt Sew Good: 30 Simple & Stylish Felt Projects – and we have the pattern for you, below. See Christine’s felt scallop cushion tutorial too.
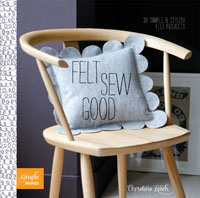 Christine’s new book is a fabulous collection of ideas for one of the most versatile fabrics in a crafter’s kit. The projects are truly gorgeous and deceptively simple, so much so that children as well as adults will have a lot of fun creating projects from this gem of a book.
Projects in the book include gifts for children, decorations, and projects for the home.
We’re thrilled to feature one of Christine’s gorgeous craft project’s, below.
Extracted with permission from Felt Sew Good by Christine Leech, published by Quadrille and distributed in NZ by Bookreps. RRP $29.99.
![]()
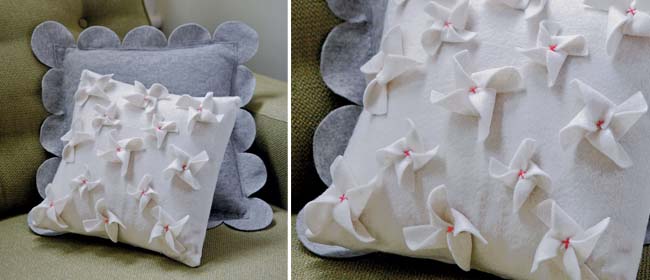
Windmill Cushion
The windmills have a simple geometric feel and are a nice change to flowers. Choose any colour felt to suit your room.
Supplies
Fabric scissors
1m x 50cm piece of felt
Matching sewing thread
30 x 30cm cushion pad
Contrasting sewing thread
Makes 1
TO MAKE THE CUSHION COVER
1. For the front panel, cut one 31 x 31cm square from the felt. For the back panels, cut one 31 x 24cm rectangle and one 31 x 14cm.
2. Place the front panel flat on your work surface. Lay the larger rectangle in line with one side of the square and lay the smaller rectangle in line with the opposite edge, making sure that all the outside edges are aligned. The two back panels should overlap in the centre to make a square the same size as the front.
3. Pin together the layers of felt. Using matching thread, stitch around all four sides about 5mm in from each edge.
4. Diagonally trim each corner within 3mm of the stitch line. This will give you neat, sharp corners when the cushion is turned right side out.
5. Turn the cushion cover right side out. Using the rounded end of a pencil, gently push the corners out into neat points. Press.
TO MAKE THE WINDMILLS
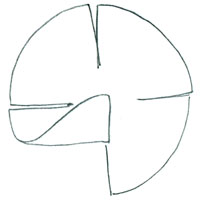 1. Cut nine 8cm-diameter circles and four 6cm-diameter circles from the felt.
2. Make four equally spaced 3cm-deep cuts into larger circles and 2cm cuts in the smaller ones. Taking one circle at a time, and in a clockwise motion, fold the edges of each quarter into the centre so that they overlap in the middle.
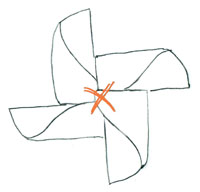
3. Once all four corners are folded over, secure with cross-stitches in a contrasting thread.
 4. Stitch the windmills to the front of the cushion cover by hand using small straight stitches. Try not to sew through the windmills sails.
5. I have placed one large windmill in each corner of the cushion, one large windmill on the edges between the corner windmills and stitched the final large one in the middle. I have filled the gaps in between with the small windmills.
TO FINISH
1. Insert the cushion pad into the cover (if you are using a felt that is a nylon and wool blend, be careful not to stretch the felt too much).
MORE CUSHION TUTORIALS
Check out Christine’s felt scallop cushion tutorial too.


Speak Your Mind