 My Favourites


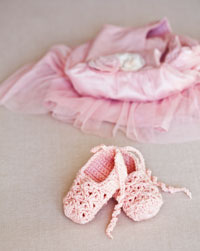
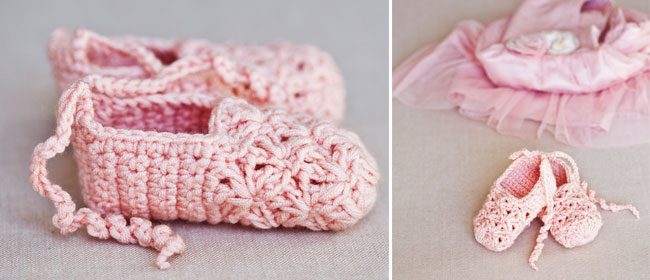 Vita Apala, author of Super Cute Crochet for Little Feet, creates these gorgeous point shoes – the ideal footwear for a prima donna ballerina.

The cutest little feet
Nothing could be cuter than a tiny pair of baby booties, and in her book Super Cute Crochet for Little Feet, Vita Apala provides a pattern for every possible style imaginable. There are shoes (like Mary Janes, brogues and party pumps), boots (including cowboy boots) and sandals galore; all up, 30 gorgeous projects with clear, step-by-step instructions and photographs.
There is an illustrated technique section that covers crochet basics as well as special stitches used in some of the more elaborate designs. All patterns are given in sizes 0-6 and 6-12 months. Each pattern is rated a skill level, so both beginners and advanced crafters will enjoy this book.
A beautiful book.
Extracted with permission from Super Cute Crochet for Little Feet by Vita Apala. Published under the Apple Press imprint and distributed in New Zealand by New Holland, $29.99.
![]()
Point Shoes
Ballerina booties
These point shoes are simply stunning – the ideal footwear for a prima donna ballerina. They have no sole, but are worked up from the toe. Make them in soft cream, baby blue or as here, a light, pastel pink.
Skill Level: II
Sizes
To fit ages:
0–6 months, sole length 9cm (3½in)
6–12 months, sole length 10cm (4in)
Changes for 6–12 months are in [ ]
Yarn
![]()
25g (1oz) DK-weight yarn
Shade: Pink
Hooks & Notions
One 3.25mm (US size D) crochet hook or size needed to obtain tension
Tapestry needle
Tension
10sts and 10 rows in dc to measure 5x5cm (2x2in)
Abbreviations
ch – chain stitch
dc – double crochet
sl st – slip stitch
tr – treble crochet
yoh – yarn over hook
* – repeat the step
Stitches & Skills
(see Crochet Basics, below)
Special stitches used:
Shell
Techniques used:
Working in rows
Working in rounds
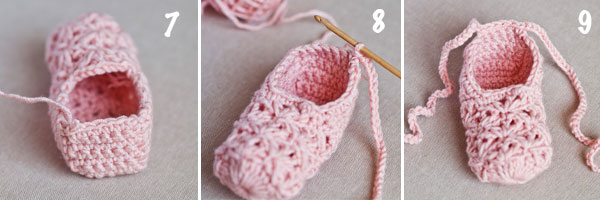
The shoes
Both shoes are made in exactly the same way.
Toe
Foundation ring: ch4, join with sl st in first ch.
Rnd 1: ch3 (count as first tr), 23tr into the ring, join with sl st in 3rd ch of ch-3 (see 1).
Rnd 2: ch1, *skip 2sts, shell in next st, skip next 2sts, 1dc in next st; repeat from * three times more, but in last repeat instead of last dc, join with sl st in ch-1. (see 2).
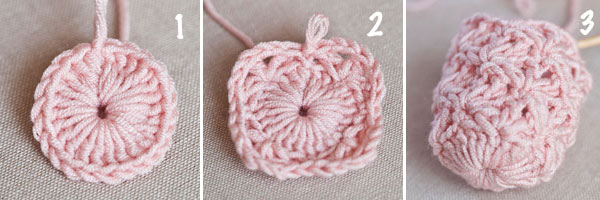
Rnd 3: ch5, 1tr in st at base of ch-5, *1dc in second tr of next shell, shell in next dc; repeat from * twice more, 1dc in second tr of next shell, 1tr in same st as first tr of Rnd 3, ch2, join with sl st in 3rd ch of ch-5.
Rnd 4: ch1, *shell in next dc, 1dc in second tr of next shell; repeat from * three times more, but in last repeat instead of last dc, join with sl st in ch-1. Repeat Rnds 3 and 4 once more for size 0–6 months; twice for 6–12 months (see 3). Don’t fasten off, but continue with Heel.
Heel
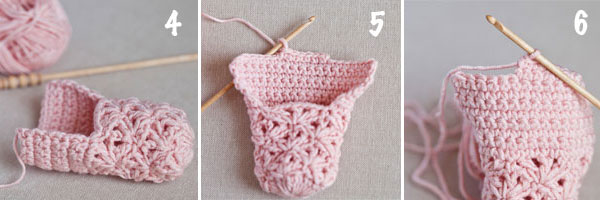
Row 1: ch1, 1dc in each of the next 18 sts and spaces (the last shell is to be left unworked), turn.
Row 2: ch1, 1dc in each of next 18sts, turn. Repeat Row 2 six times more. Fasten off (see 4).
Heel flap
Join the yarn in 7th stitch from the left-hand Heel edge.
Row 1: ch1, 1dc in st at base of ch-1, 1dc in each of next 5sts, sl st in each of next 2sts, turn (see 5).
Row 2: skip 2sl sts, 1dc in each of next 6dc, sl st in each of next 2dc (the ones that remained unworked on side of Heel), turn (see 6).
Rows 3–4: repeat Row 2 twice more.
Row 5: skip 2sl sts, 1dc in each of next 6dc, sl st in next dc along edge of Heel, turn.
Row 6: skip sl st, 1dc in each of next 6dc, sl st in next dc along edge of Heel, turn.
Rows 7–8: repeat Row 6 twice more (see 7). Round 1: ch1, work 1dc evenly around the shoe, join with sl st in first dc. Fasten off.
Tie
Ch40, 1dc in first st of heel flap (see 8), 1dc in each of next 5sts, ch40. Fasten off. (see 9).
Weave in all ends.
Techniques
Basic stitches
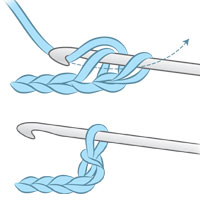 Double crochet (dc)
1. Insert the hook, front to back, into the next stitch, yoh. Draw through one loop to front; there should be two loops on the hook, yoh.
2. Draw through both loops to complete double crochet (dc).
![]()
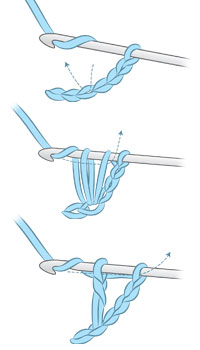
Treble crochet (tr)
This makes a more open fabric, because the stitches are taller.
1. Wrap the yarn over the hook from back to front (yoh). Insert the hook into the next stitch, from front to back, yoh again and draw through the stitch.
2. There should be three loops on the hook, yoh and pull through two loops.
3. There should be two loops on the hook, yoh, and pull through the remaining two loops to complete the stitch.
![]()
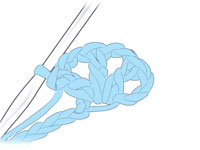 Special Stitches
Shell
(tr, ch2, tr, ch2, tr) in specified stitch.


Oh My Goodness! These are the most adorable baby shoes that I have seen in a long time. I look forward to making some.
Thank you for the pattern.
🙂
These are the most precious little slippers I have ever witnessed!!! I have what may be a silly question but are these instructions written in US terms or in UK terms? I had assumed that they were US terms because of the mention of using a US-D Hook, yet, when I looked at the Basic Stitches it appears that the double crochet is a double crochet in UK terms. Am I correct in assuming this and just convert it to US terms while making these? I know a little girl who absolutely “needs” a pair of these. Thank you for sharing and for your time.
Hi Cindy. That’s not a silly question at all. It is in UK terms. Have fun making them!
Hi There!
I think these are so adorable! However I have tried about 5 different times of how to do the “treble crochet”… I understand the picture but when doing the pattern I dont see how it matches when beginning round 2… And there are various forms of how to treble crochet. Are there any videos or more pictures of what you mean exactly?
Hi Desirae
Aren’t they gorgeous booties? Unfortunately, as this is a book extract, we do not have any further images or video. This is English terms though, which hopefully will help.
Thanks for this pattern. I’m going to make them for my newest niece. The instructions are easy to follow. The booties are so precious
🙂 Have fun!
I am having difficulty with, “Round 3: ch5, 1tr in st at base of ch-5, *1dc in second tr of next shell, shell in next dc; repeat from *”
There are so many trebles and stitches they seem to be on top of each other due to the shells. Do you have video, or more pic that show precisely where to place the stitches? I am determined to make this shoe, it’s so cute!
Thanks!
I’m sorry Yvette, but this is an extract from a book, so unfortunately we cannot help you in this instance.
So, I’ve been crocheting for years but never really done much with it. But here lately I’ve been making alot of different things. but I’ve followed your instructions several times now and I don’t understand how do you finish the back and sides. I’ve never done these before. It’s ashame you don’t have a tutorial of these beautiful ballerina shoes. I would greatly appreciate it if you could explain better. Thank you
Janet Brown
USA
I’m really sorry Janet, but this is an extract from a book, so we cannot help you here.
You work the heel in a similar manner as you would a heel in a sock.
You are working the slip stitches into the unworked stitches from the heel. This “turns” the heel, creating the cup that cradles the heel of the foot while also closing the back of the heel. You should end with the sides and heel being even allowing you to work the dc (UK) stitches along the top as a finishing border.
hello, I am making these right now. Just to be clear, rounds 3 and 4, Iam going to do twice each, totally of four shell rows? Thank you!
Hi Stephanie
Really sorry but we can’t help you here as this is a book extract.