 My Favourites

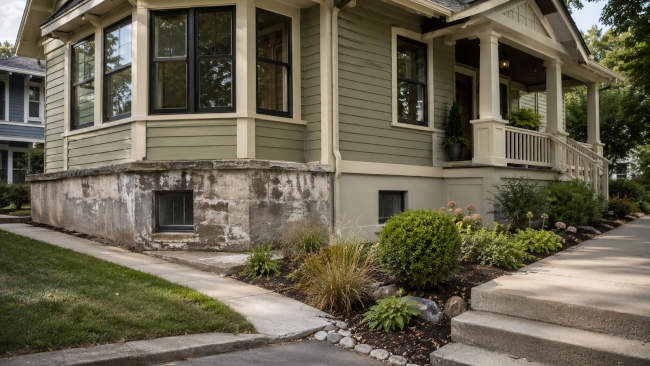
Older homes carry a kind of character that new builds rarely replicate. The proportions, the craftsmanship, the way a century-old porch sits against the street: all of it adds up to something deeply appealing. But time leaves its marks, and the foundation is often where those marks are most visible. Stained concrete, crumbling mortar joints, and mismatched patch repairs can make even a well-loved home look neglected from the outside.
The good news is that you have real options. Refreshing the look of an aging foundation is entirely achievable, provided you approach it with the right sequence: structural integrity first, cosmetic improvement second. Older homes were built with different materials and techniques than modern construction, so what works on a new build may not suit a house that is fifty or eighty years old. Understanding what you are working with is what separates a lasting improvement from one that causes new problems within a season or two.
Assess the Foundation Before Touching the Surface
No cosmetic work should begin until you know the foundation is structurally sound. This is not a precaution you can skip. Aesthetic upgrades applied over hidden structural damage do not fix the problem. They obscure it, sometimes making it harder and more expensive to address later.
Walk the perimeter of your home and look carefully. Hairline cracks in older concrete are common and generally harmless. What you are watching for are wider fissures, horizontal cracks running along block foundations, areas where the concrete is actively crumbling, or signs that the wall is bowing inward. Inside the house, uneven floors, doors that have started sticking, and gaps opening up around window frames can all indicate movement in the foundation below.
If any of those signs are present, the right move is to bring in a professional before picking up a paintbrush. Hiring a reliable foundation repair company will give you a clear picture of what the structure actually needs: crack injection, underpinning, drainage correction, or moisture control. Once you have that professional sign-off, you can invest in the cosmetic work with confidence that it will hold.
With the foundation confirmed as stable, cleaning comes next. Decades of exposure leave behind layers of dirt, mold, mildew, and efflorescence. That white, powdery residue forms when water pulls mineral salts through the concrete as it moves. A stiff bristle brush, a mild masonry detergent, and some patience can dramatically change the appearance of the surface before any product is applied.
Pressure washing is tempting but requires care on older masonry. High-pressure streams can blast away loose mortar, damage the face of aged concrete, and drive water into places where it will cause problems. A wide-angle nozzle at low pressure is safer, and for surfaces in poor condition, hand scrubbing is the better choice. Whatever method you use, the surface must be completely clean and dry before any paint, stain, or coating goes on. Adhesion depends on it.
Painting and Staining the Foundation
Paint is one of the most accessible ways to unify and refresh an older foundation. It covers staining, mismatched concrete patches, and the general discoloration that accumulates over time. The key is choosing the right product, because standard exterior house paint is not designed for concrete and will fail quickly.
If you’re considering painting your home’s foundation, look for an elastomeric masonry paint. These products are formulated to flex with temperature changes, which matters on a surface that heats and cools dramatically across seasons. They bridge small hairline cracks, create a durable waterproof layer, and still allow water vapor to escape from within the wall. This last quality matters because trapping moisture behind an impermeable coating can cause serious damage to older concrete. A masonry primer applied before the topcoat is not optional; it is what makes the paint bond properly and last.
Concrete stain is worth considering if you prefer a finish that works with the material rather than covering it. Unlike paint, which sits on the surface as an opaque film, stain penetrates into the pores of the concrete. The result is a translucent, variegated color that highlights the natural texture rather than hiding it. Stains do not peel or chip because there is no surface film to fail. Acid-based stains react chemically with minerals in the concrete to produce mottled earth tones, while water-based acrylic stains offer a broader color range with more uniform results. Either way, the long-term maintenance burden is lower than with painted surfaces.
Parging and Stucco for a Smooth, Uniform Finish
Some foundations are too far gone for paint or stain to do much good. Heavy spalling, deep pitting, or the rough, uneven face of an older concrete block wall calls for something that can resurface the whole thing. That is where parging comes in.
Parging is the application of a thin coat of cement-based mortar over the existing foundation face. Done well, it creates a smooth, clean surface that looks modern and intentional. It also seals surface pores, adding a layer of protection against moisture infiltration. The visual transformation can be remarkable. A pitted, stained block foundation becomes a crisp, uniform wall that reads as a deliberate design choice rather than a remnant of old construction.
This kind of upgrade ranks among the best budget DIY projects, delivering a significant curb appeal improvement for a relatively modest material cost. That said, the prep work is critical. The existing surface must be clean and dampened before the mortar is applied, and some situations call for a bonding agent or metal lath, particularly if the original surface is painted or unusually smooth. Parging is within reach for a confident DIYer, but a professional finish is noticeably different, particularly in climates with hard freezes where a poorly applied coat will crack and flake within a winter.
Stone Veneer for a More Substantial Upgrade
For homeowners who want to make a stronger visual statement, manufactured stone veneer is a compelling option. It delivers the appearance of a traditional stone foundation: solid, grounded, and timeless, without the structural demands or cost of full masonry.
Modern stone veneer is made from concrete cast in molds and tinted with iron oxide pigments to replicate the look of natural stone or brick. Because it is lightweight, it can be applied directly to a prepared foundation wall without requiring additional structural reinforcement. The range of available styles is broad enough to complement nearly any architectural character, from a Victorian-era home to a mid-century ranch.
Installation involves a weather-resistant barrier, a metal lath, and mortar-set stones applied to the exterior face of the foundation. Because the veneer sits entirely on the outside, it does not affect the structural behavior of the wall beneath. The finished result tends to add meaningful value to the property and gives the house a more substantial, well-built appearance from the street.
Landscaping as a Complementary Strategy
Not every improvement to the foundation’s appearance requires touching the foundation at all. Thoughtful planting along the base of the house can soften the visual transition between the structure and the ground, drawing the eye away from worn concrete and toward color, texture, and life.
Evergreen shrubs, ornamental grasses, and low-growing perennials work well for this purpose. The selection should suit the light and soil conditions of your specific site, and mature plant sizes matter. Shrubs planted too close to the foundation restrict airflow and, over time, can allow roots to work into the concrete or mortar joints. A general rule is to keep plants at least 18 inches from the foundation wall.
Grading is equally important. The soil in any planting bed along the foundation must slope away from the house so that rainwater drains outward rather than pooling at the base of the wall. A layer of decorative gravel or mulch finishes the bed cleanly and suppresses weeds. If you are already refreshing the exterior with paint or stain, using aerosol paint can help you coordinate the look of planters, window boxes, and other exterior elements with the newly updated foundation.
Keeping the Improvement in Good Shape
The work does not end once the project is finished. An upgraded foundation needs periodic attention to stay looking good and performing well.
Make a habit of walking the perimeter each spring and fall. Look for new cracks, areas where paint or parging is lifting, and any signs of water staining that might indicate a drainage problem. Clear debris and wet leaves away from the base of the wall, and check that gutters and downspouts are directing water well away from the house. Water is the primary threat to any foundation, cosmetic and structural alike, and staying ahead of drainage issues is far less expensive than dealing with the consequences of ignoring them.
An older foundation does not have to look its age. With the right sequence of assessment, surface preparation, and targeted upgrades, you can give the base of your home a clean, polished appearance that holds up for years without putting the structure at risk.
Conclusion
An older foundation does not have to be a source of embarrassment or anxiety. With the right approach, it can become one of the most visually grounding features of your home’s exterior. The key is to work in the correct order: assess first, clean thoroughly, then choose the cosmetic treatment that best suits the condition of the surface and the character of the house.
A fresh coat of elastomeric paint, a stained finish, a smooth parged surface, or the bold statement of stone veneer can all deliver lasting results when the prep work is done properly. Combine any of them with thoughtful landscaping and consistent seasonal maintenance, and you have a foundation that not only supports the house structurally but also contributes meaningfully to its overall appeal. Invest in it now, and it will hold up for decades to come.





Speak Your Mind