 My Favourites

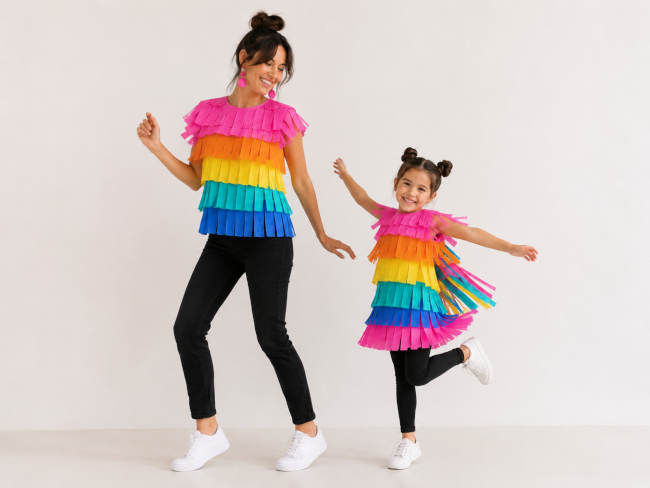
These bright matching costumes are easy to make, inexpensive and recyclable! Use the same colours for a matching look, or let each person choose their own colour combination.
You will need
- Plain T-shirt, singlet, sweatshirt or simple dress as the base
- Crepe paper streamers in several colours
- Fabric glue, hot glue or double-sided fabric tape
- Scissors
- Ruler or measuring tape
- Pencil or chalk
- Optional: leggings, sneakers, hair accessories, earrings or a matching headband
Step 1: Choose your base outfit
Start with a plain top, sweatshirt or simple dress. A black, white or neutral base works well because the colours stand out, but you can also use a bright base if you want a louder costume.
Step 2: Pick your colours
Choose four to six colours of crepe paper. Bright colours give the costume a piñata-style look, while pastels make it softer and prettier.
A good colour order might be:
Pink
Orange
Yellow
Turquoise
Blue
Pink again at the bottom
You can use the same sequence for both costumes so they clearly match.
Step 3: Cut the crepe paper strips
Measure across the front of the top from one side seam to the other. Cut several lengths of crepe paper a little wider than this measurement so you have room to trim the edges later.
For each colour, cut enough strips to go around the front of the costume. If you want the fringe to go all the way around, cut longer strips or make separate front and back pieces.
Step 4: Make the fringe
Take one strip of crepe paper and cut narrow vertical slits along one long edge, stopping about 2–3cm from the top. This uncut section is where you will attach the fringe to the clothing.
Keep cutting until the whole strip is fringed. Repeat with each colour.
The fringe does not need to be perfect. Slightly uneven cuts actually make it look more playful.
Step 5: Mark the rows
Lay the top flat. Using chalk or a pencil, lightly mark horizontal guide lines across the front. Space the lines about 8–10cm apart, depending on how deep you want each fringe layer to be.
Start near the neckline or chest and work your way down.
For a child’s costume, use slightly smaller spacing so the layers don’t look too bulky.
Step 6: Attach the first row
Start at the bottom of the top and work upwards. This is important because each new row will overlap the one beneath it.
Apply a line of fabric glue, hot glue or double-sided fabric tape along your lowest guide line. Press the uncut edge of the crepe paper onto the glue, with the fringe hanging down.
Let it set for a few minutes before adding the next row.
Step 7: Add the remaining colours
Continue adding rows of fringe, working from the bottom to the top. Each new row should slightly overlap the row below, hiding the glued edge.
Keep the colours in the same order for the adult and child costumes, or reverse the order for a fun matching-but-not-identical look.
Step 8: Trim the sides
Once all the rows are attached, trim any excess crepe paper from the sides. If you want the costume to look fuller, wrap the fringe around to the back as well and glue it in place.
For a quicker version, decorate only the front and leave the back plain.
Step 9: Add shoulder detail
To make the costume look more finished, add one or two shorter rows of fringe around the shoulders or sleeves. This gives the outfit a party-costume feel and helps the top look intentional rather than like a decorated T-shirt.
For the child’s costume, you can also add small strips of crepe paper to the sides to create a playful “tail” or extra movement.
Step 10: Finish the look
Pair the costume with simple leggings, jeans or black pants and sneakers. Add colourful earrings, a bright headband, hair buns, or a matching crepe-paper wrist cuff.
To make a wrist cuff, wrap a strip of cardboard around the wrist, tape it into a loose bracelet shape, then glue small pieces of crepe paper fringe around it.
Tips
Crepe paper can tear if pulled too hard, so keep the costume loose and comfortable.
Avoid wearing it in the rain, as crepe paper colours may run.
If making this for a party or Halloween, prepare it the day before and hang it up overnight so the glue has time to dry properly.





Speak Your Mind