 My Favourites

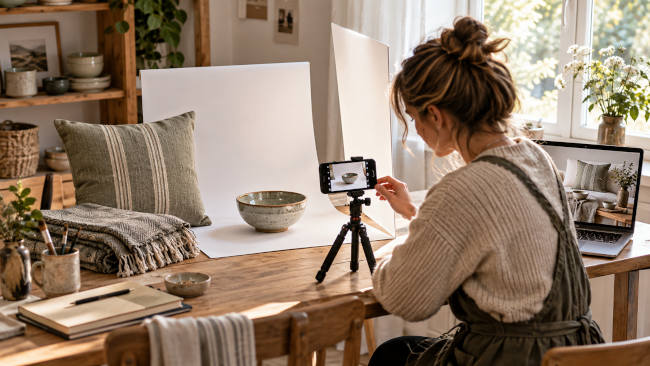
There is a particular heartbreak in making something lovely and then photographing it. The cushion cover took a weekend to sew and the photo makes it look like a tea towel. The ceramic bowl has a glaze you spent a month getting right and on screen it reads as beige. You know the object is good. The picture does not.
For anyone selling homeware from a spare room, a garage or a shared studio, this is the gap between the work and the income. The big brands do not have better products than you. They have better pictures, and more of them, and all of them match. Here is how they do it, and how a small maker can borrow the parts that fit.
First, what the picture has to do
A product image has three jobs. It has to show the thing accurately, so the buyer is not surprised. It has to make the thing desirable, which usually means showing it in a setting. And it has to sit next to your other images without looking like it came from a different shop.
Most home-made product photos manage one of the three. The phone snap on the windowsill is accurate. The styled shot with the flowers is desirable. Almost none of them match each other, because each one was taken on a different day in different light.
The window and the white card
The cheapest route, and the one worth doing properly before spending a cent on anything else.
Pick one window that gets soft light, not direct sun. Put a table in front of it. Tape a large sheet of white card so it curves from the table up the wall behind, with no visible corner. Stand a second piece of white card on the far side of the product to bounce light back into the shadows. Put your phone on something that does not move, at a height you mark with tape, and shoot every product from that same spot.
That last part is the whole secret. Not the card, not the window. The same spot. Do it for every item, on overcast days, and your images will match each other for the first time.
Where it falls down is scale and variety. A bowl and a floor cushion do not fit the same setup. Winter light and summer light look different. And the moment you want the product in a room rather than on a card, you are back to borrowing your sister’s lounge.
The shared studio day
Many towns now have a photography studio that rents by the hour, and small makers often club together to book a day and split the cost. You get proper lights, a proper backdrop, and sometimes a photographer who will shoot to your list.
The results are a clear step up. The cost is manageable when shared. The problem is timing. Your new range is ready in March and the next group booking is in May. And the room shots, the ones that make a linen throw look like it belongs in a house rather than a studio, still need a house.
The route the big brands actually use
Here is the thing nobody tells small makers. Most of the room shots in the big homeware catalogues were never photographed. The cushion is real, in the sense that it was designed and manufactured, but the picture of it on a sofa in a sunlit lounge was built on a computer. The sofa, the lounge and the sun are digital. The cushion was modelled from the maker’s own sample and fabric.
Studios that produce visuals for home decor brands do this as their whole business, and the cost has come down far enough that it is no longer only for the big players. A small maker sends a sample, or good flat photos and measurements, and gets back the product in a set of rooms, in consistent light, from consistent angles. A new colourway becomes a fabric swap rather than a new shoot. A seasonal collection can be shown in a summer room and a winter room from the same model.
For a maker with a growing range, this is often cheaper per image than the shared studio, and the images all match by definition because they came out of the same digital room.
Which route for which maker
If you have under a dozen products that are similar in size, build the window setup and do it well. It costs almost nothing and the discipline of shooting from one spot will fix most of your problems.
If you have a range that varies, or a launch every season, or products that need to be seen in a room to make sense, look at rendering for the hero images and use the window setup for detail shots and close-ups of texture. The two work well together, because the render shows the room and the phone shows the weave.
The shared studio sits between the two and suits makers who want a photographer’s eye once or twice a year for the campaign shots.
A word on the close-up
Whatever produces your hero images, keep one thing for yourself: the detail shot. The stitch on the seam, the glaze pooling in the bottom of the bowl, the slub in the linen. These are the images that tell a buyer a person made this, and they are the ones a phone does well because the subject is small and the light only has to be right for a few centimetres. Shoot them by the window, in the same spot, and place them second in every listing after the room shot. The room sells the idea. The close-up sells the maker.
The rule that matters more than the method
Whatever you choose, choose once. The maker whose images all match, even if they are modest, looks like a business. The maker with three beautiful shots and thirty inconsistent ones looks like a hobby, and buyers price accordingly.
Pick your background, your angle, your light and your spot. Write them down. Then make everything else fit.





Speak Your Mind