 My Favourites


 This easy project is great for beginners and makes a lovely gift idea for friends and family. Jenny McCabe, in her new book The Hand Printed Home, shows us how it’s done. See the project below.
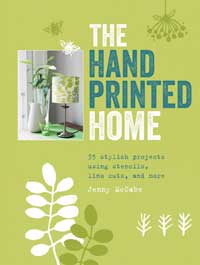 Jenny McCabe is a designer and maker working with printed paper and textiles. Her new book, The Hand Printed Home: 35 stylish projects using stencils, lino cuts, and more is a wonderful reference to making stylish home accessories with fabrics you’ve printed yourself.
Projects range from chic pillows to curtains and bedsheets, as well as tea towels, table runners, quilts and other practical designs that will be endlessly useful.
If you’ve never handprinted before, the comprehensive techniques section will teach you all you need to know, including how to use a variety of different printing methods. Plus, the sewing know-how section will guide beginners, as well as provide a handy reference for experienced stitchers.
This is a great book for both beginners and experienced crafters.
![]()
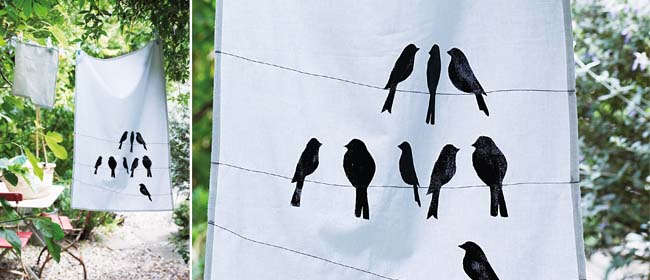
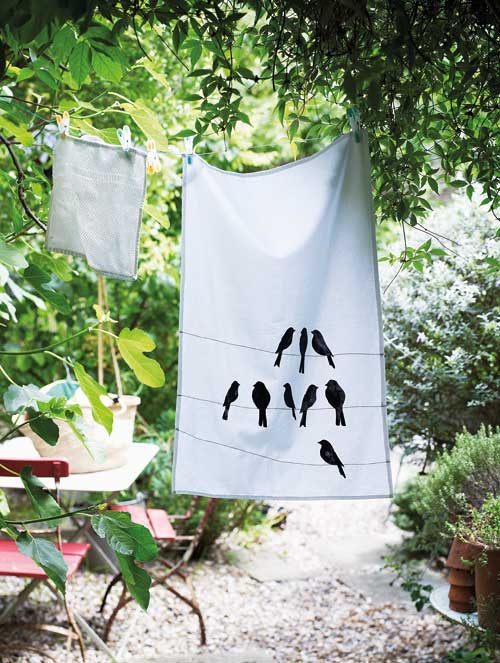
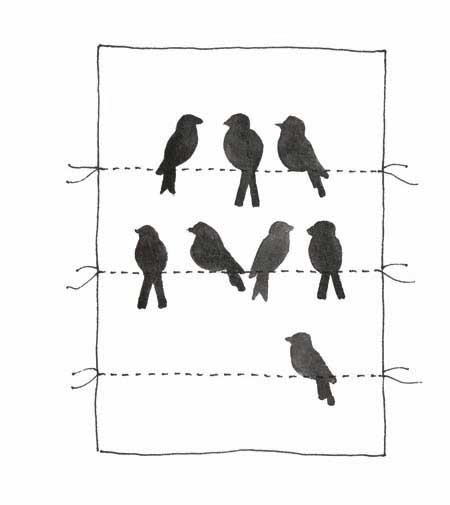
Bird-Print Tea Towel
Click to enlarge
A tea towel can be both useful and beautiful in your kitchen. Use a strong cotton or linen fabric so it’s up to the job of drying all your pots and pans.
It’s such a simple and easy project, you can make a few so you always have a clean one ready to use. They also make great housewarming gifts, so make one for all your friends, too.
Materials
Fabric: 15 x 22in (38 x 55cm)
Cotton tape: 1 x 4in (2.5 x 10cm)
Tailor’s chalk
Pins, matching thread, black thread
Printing tools
Print motifs (download them here)
Craft knife
Freezer paper or plain paper
Temporary spray adhesive (optional)
Sponge
Fabric paint
Hairdryer (optional)
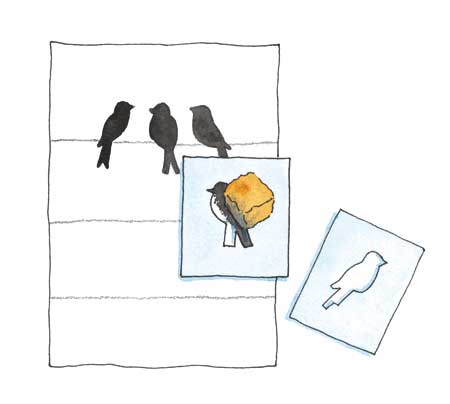
1. Iron your fabric, cut it to size and lay it on a flat surface. Mark in tailor’s chalk where you want the “wires” to be placed.
2. The design is applied using the stencil technique, as outlined below. Prepare your stencils using the three different bird motifs.
3. Place each stencil in turn in your chosen position along the chalk line. If your stencil is made from freezer paper, you can iron it in place, otherwise lightly spray the back with temporary spray adhesive.
4. Sponge the fabric paint onto the fabric through the stencil. Practice first on a scrap of fabric until you are confident you can achieve a clean, clear print. Once the paint is dry—you can use a hairdryer to speed up the process—peel the stencil away very carefully, then move on to the next bird. When you are happy with your finished design, iron the fabric to set the paint.
5. Now finish off the design by machine-stitching the black wires for the birds to sit on.
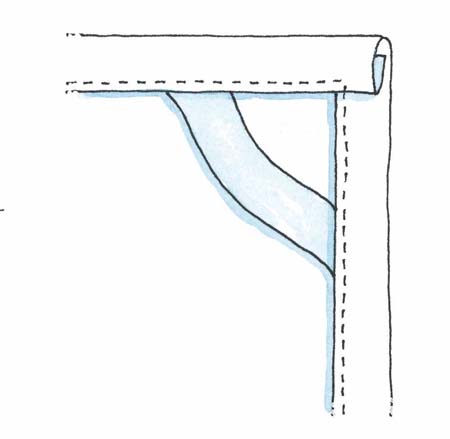
6. The last step is to hem the raw edges of the tea towel. With the wrong side facing you, fold under the raw edges along all four sides and pin. Fold the fabric under a second time, this time by 1⁄2in (1cm), so the raw edges are enclosed. Press the folds flat.
7. Before you sew, make the hanging loop by tucking your piece of cotton tape under the adjacent hems in the top left-hand corner of the tea towel. Now sew a neat line of stitches close to the edge of the first fold to keep everything in place. Secure the ends of the tape in your stitching as you go and take care to stitch a neat right angle around the corners.
PRINTING TIPS
This design is created using stencils for the birds and lines of stitching for the wires. Print your birds in small groups along the “wires” to balance the design.
Stencils
Stencils and screen prints are forms of resist printing. In this type of printing, part of the design “resists” or blocks the paint and prevents it coming into contact with certain parts of the surface being printed.
Stencils and screen prints give a positive print so there is no need to worry about producing a design in reverse.
STENCILS
Stencils can be made from many different materials—paper, thin sheets of plastic, and masking tape are some examples. The stencil will “resist” the paint and prevent some areas from being printed.
Freezer paper is a plastic-coated kitchen paper that’s great for stencils. If you place it shiny side down on fabric and iron over it, it will adhere to the fabric long enough for you to print. Alternatively, you can cut an ordinary paper stencil and use repositionable spray glue to hold it in place.
HOW TO USE A STENCIL
1. Draw your design onto the paper, leaving a wide border around the edge of the design. Cut out the design using a craft knife. If you are planning on a repeat design that is intended to cover a large area, you should cut several stencils the same as they will begin to clog up and degrade after a few uses.
2. Position your stencil on the fabric and sponge lightly or use a sponge roller to evenly coat the surface with fabric paint. Take care not to move the stencil as you apply the paint.
3. Leave to dry or use a hairdryer to speed up the drying, then remove the stencil. If you are working with a repeat design, reposition the stencil and sponge with paint again.
MASKING TAPE STENCILS
Using masking tape to create a stencil to “resist” the paint is one of the easiest ways to transform an object or a piece of fabric.
HOW TO USE MASKING TAPE STENCILS
Make sure that your fabric is ironed and flat or, if you are working with a painted surface, that it is clean and dry, with no flaking paint. Mark out your design with chalk if necessary, then apply the tape.
Stick it down firmly, making sure the edges don’t conceal any bubbles or gaps, or the paint will bleed underneath. Depending on your design, you can either mask off all the areas in one go, or you can mask one part at a time. If you want to apply the paint in layers/stages, make sure it is thoroughly dry before moving on to masking for the next layer/stage. When you have finished, carefully remove all the tape and dry your paint completely before ironing the fabric.


[…] DIY Hand Stenciled Tea Towels – Sweet Living Magazine – Sweet Living Magazine’s DIY Hand Stenciled Tea Towels are a fun way to add some handmade charm to your kitchen. These tea towels feature hand-stenciled designs that you can create yourself with Sweet Living Magazine’s easy-to-follow tutorial. Whether you’re a beginner or an experienced crafter, you can create your own unique hand-stenciled tea towels in no time. […]